Installation instructions for Windows
- Download the zip package and unzip to a desired folder.
- Open the folder and start “AudioStreamer.exe” as administrator.
(Right-click and “Run as administrator”, otherwise the database cannot be created)

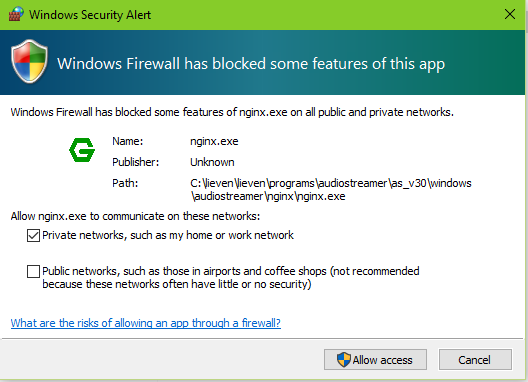
A message might appear similar to : “windows security alert windows firewall has blocked some features of this program”. Just click on “Allow access”.
- By default AudioStreamer is running on port 9090.
Open your favorite web browser (ie, chrome, firefox …) and type http://localhost:9090
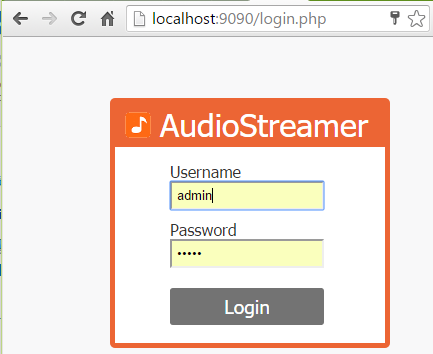
You should see a login screen. The default user and password are:
user = admin, password = start
You should change your password to something more secure afterwards.
More on how to do this can be found in the user manual (also in this forum). - Next step to complete, is to fill in the path to your music collection.
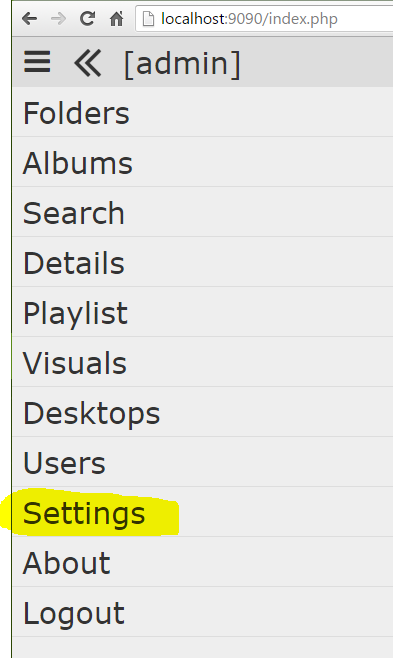
Click on “Settings”.
Fill in the path to your music folder eg: c:/music (and save this setting).
Next click on the button “(re)create database”.
AudioStreamer will scan this folder for all the music files.

After this has finished, just refresh and you’re ready to play some music!
Installation instructions for Linux
- Download the zip package and unzip to a desired folder.
The zip/rar archives for AudioStreamer on linux do not include PHP and Nginx, which is why they are smaller in size.
PHP8 and Nginx will need to be installed also. - Here are the installation instructions for Linux Mint.
Install Nginx:sudo apt-get update sudo apt-get install nginxThe nginx.conf file needs to be changed.
In case you need to change the rights of this file:
sudo chmod 666 /etc/nginx/nginx.confHere is the content of my nginx.conf file.
You should match the server part and change the root to the destination of the AudioStreamer folder.user www-data; worker_processes auto; pid /run/nginx.pid; include /etc/nginx/modules-enabled/*.conf; events { worker_connections 768; # multi_accept on; } http { ## # Basic Settings ## sendfile on; tcp_nopush on; types_hash_max_size 2048; # server_tokens off; # server_names_hash_bucket_size 64; # server_name_in_redirect off; include /etc/nginx/mime.types; default_type application/octet-stream; ## # SSL Settings ## ssl_protocols TLSv1 TLSv1.1 TLSv1.2 TLSv1.3; # Dropping SSLv3, ref: POODLE ssl_prefer_server_ciphers on; ## # Logging Settings ## #access_log /var/log/nginx/access.log; access_log off; error_log /var/log/nginx/error.log; ## # Gzip Settings ## gzip on; # gzip_vary on; # gzip_proxied any; # gzip_comp_level 6; # gzip_buffers 16 8k; # gzip_http_version 1.1; # gzip_types text/plain text/css application/json application/javascript text/xml application/xml application/xml+rss text/javascript; ## # Virtual Host Configs ## #include /etc/nginx/conf.d/*.conf; #include /etc/nginx/sites-enabled/*; server { listen 9090; server_name localhost; index index.php; root /home/lieven/Programs/AudioStreamer/linux/AudioStreamer/core/; location / { try_files $uri $uri/ /index.php; } location ~ \.php$ { try_files $uri =404; fastcgi_pass unix:/run/php/php8.2-fpm.sock; fastcgi_index index.php; fastcgi_param SCRIPT_FILENAME $document_root$fastcgi_script_name; include fastcgi_params; } } }Make sure nginx has rights on the AudioStreamer folder:
sudo chmod -R 777 /home/lieven/AudioStreamer -RNext is the install of PHP8
(PHP8 is installed through the ppa of Ondřej Surý)sudo add-apt-repository ppa:ondrej/php sudo apt-get update sudo apt-get install php8.2 php8.2-common php8.2-cli php8.2-fpm sudo apt-get install php8.2-sqlite3 sudo apt-get install php8.2-gd sudo apt-get install php8.2-mbstringRestart Nginx and PHP8:
sudo service php8.2-fpm restart sudo service nginx restart - By default AudioStreamer is running on port 9090.
Open your favorite web browser (ie, chrome, firefox …) and type http://localhost:9090
You should see a login screen. The default user and password are:
user = admin, password = start
You should change your password to something more secure afterwards.
More on how to do this can be found in the user manual (also in this forum). - Next step to complete, is to fill in the path to your music collection.
Click on “Settings”.
Fill in the path to your music folder eg: c:/music (and save this setting).
Next click on the button “(re)create database”.
AudioStreamer will scan this folder for all the music files.
After this has finished, just refresh and you’re ready to play some music!
Remote Access
Audiostreamer gives you access to your music anywhere on the internet. You just need an internet connection and a browser. If you want access on the computer where AudioStreamer is installed then you can use http://localhost:9090.
If you want access outside your home network then your router must have a public IP-address and must be accessible from the internet. (This shouldn’t be a problem for most internet connections.)
You also will have to configure the port forwarding manually on your router.
https://www.portforward.com gives you much more info on how to accomplish the port forwarding.
The default port that AudioStreamer is using is normally 9090, so you should forward 9090 in your router configuration to the IP-address of the computer on which AudioStreamer is installed.
(If this is all to confusing, you should contact someone with network configuration experience.)
When the port forwarding is configured, you should be able to access AudioStreamer like eg http://78.45.32.12:9090 (in case your static IP-address is “78.45.32.12”).
Instead of using the hard to remember IP-address, you can use the services from dynamic DNS providers, eg https://www.dnsexit.com/.
Transcoding to mp3
If you want to be able to stream all supported music formats then you will have to enable the transcoding (via “settings”).
Supported audio formats: ‘aac’, ‘ac3’, ‘aiff’, ‘aif’, ‘m4a’, ‘ape’, ‘flac’, ‘m4a’, ‘m4b’, ‘mp2’, ‘mp3’, ‘mp4’, ‘mpa’, ‘mpc’, ‘ogg’, ‘opus’, ‘tta’, ‘wv’, ‘wav’, ‘wma’
Otherwise only mp3 files will work.
For transcoding to work you need FFmpeg and lame.
The resampling will be performed in your specified bitrate.
Due to legal reasons it’s not possible to include FFmpeg and Lame.
Windows
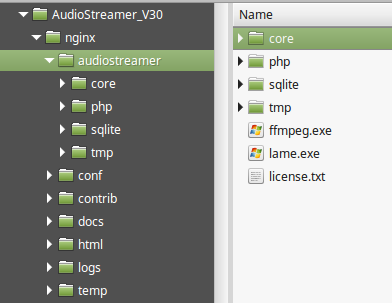
You need “ffmpeg.exe” and “lame.exe” in the following directory “./nginx/audiostreamer”.
You can download “ffmpeg.exe” here: http://ffmpeg.zeranoe.com/builds
You can download “lame.exe” here: http://www.rarewares.org/mp3-lame-bundle.php
Linux
You need to install FFmpeg and lame
sudo add-apt-repository ppa:mc3man/trusty-media
sudo apt-get update
sudo apt-get install ffmpeg
sudo apt-get install lame libmp3lame0
More info:
https://www.ffmpeg.org
https://lame.sourceforge.net/index.php